
Table of Contents
Time Squeeze Fundamentals
What is Time Squeeze?
Time Squeeze is an automatic time tracking solution for PCs. Unlike traditional time trackers, it does not require manual input. It is not a stopwatch. Instead, it intelligently monitors your computer usage to provide accurate logs without interrupting your workflow. Not only does it assist in billing clients for work done on their projects, it also help inform productivity decisions.
How Does It Work?
Once you install Time Squeeze on your PC, it automatically starts tracking your work. It records the apps you use, the websites you visit, and the files you work on.
Sessions, Activities, and Tags
Every time you start using your computer, Time Squeeze creates a new session. Within each session, it tracks activities, which are the individual tasks you perform, such as using a specific application or visiting a website. You can add tags to sessions and activities to categorize your work and filter them by client or project for easier reporting.
Search and Export
Time Squeeze provides powerful search and export tools to filter your tracked data. Everything can be exported for further analysis or reporting.
Navigating the Time Squeeze App
Time Squeeze provides a user-friendly, but powerful and feature-rich interface to efficiently manage your time tracking. There are four main “views” or tabs in the app: Sessions, Tags, Search, and Export.
Sessions View
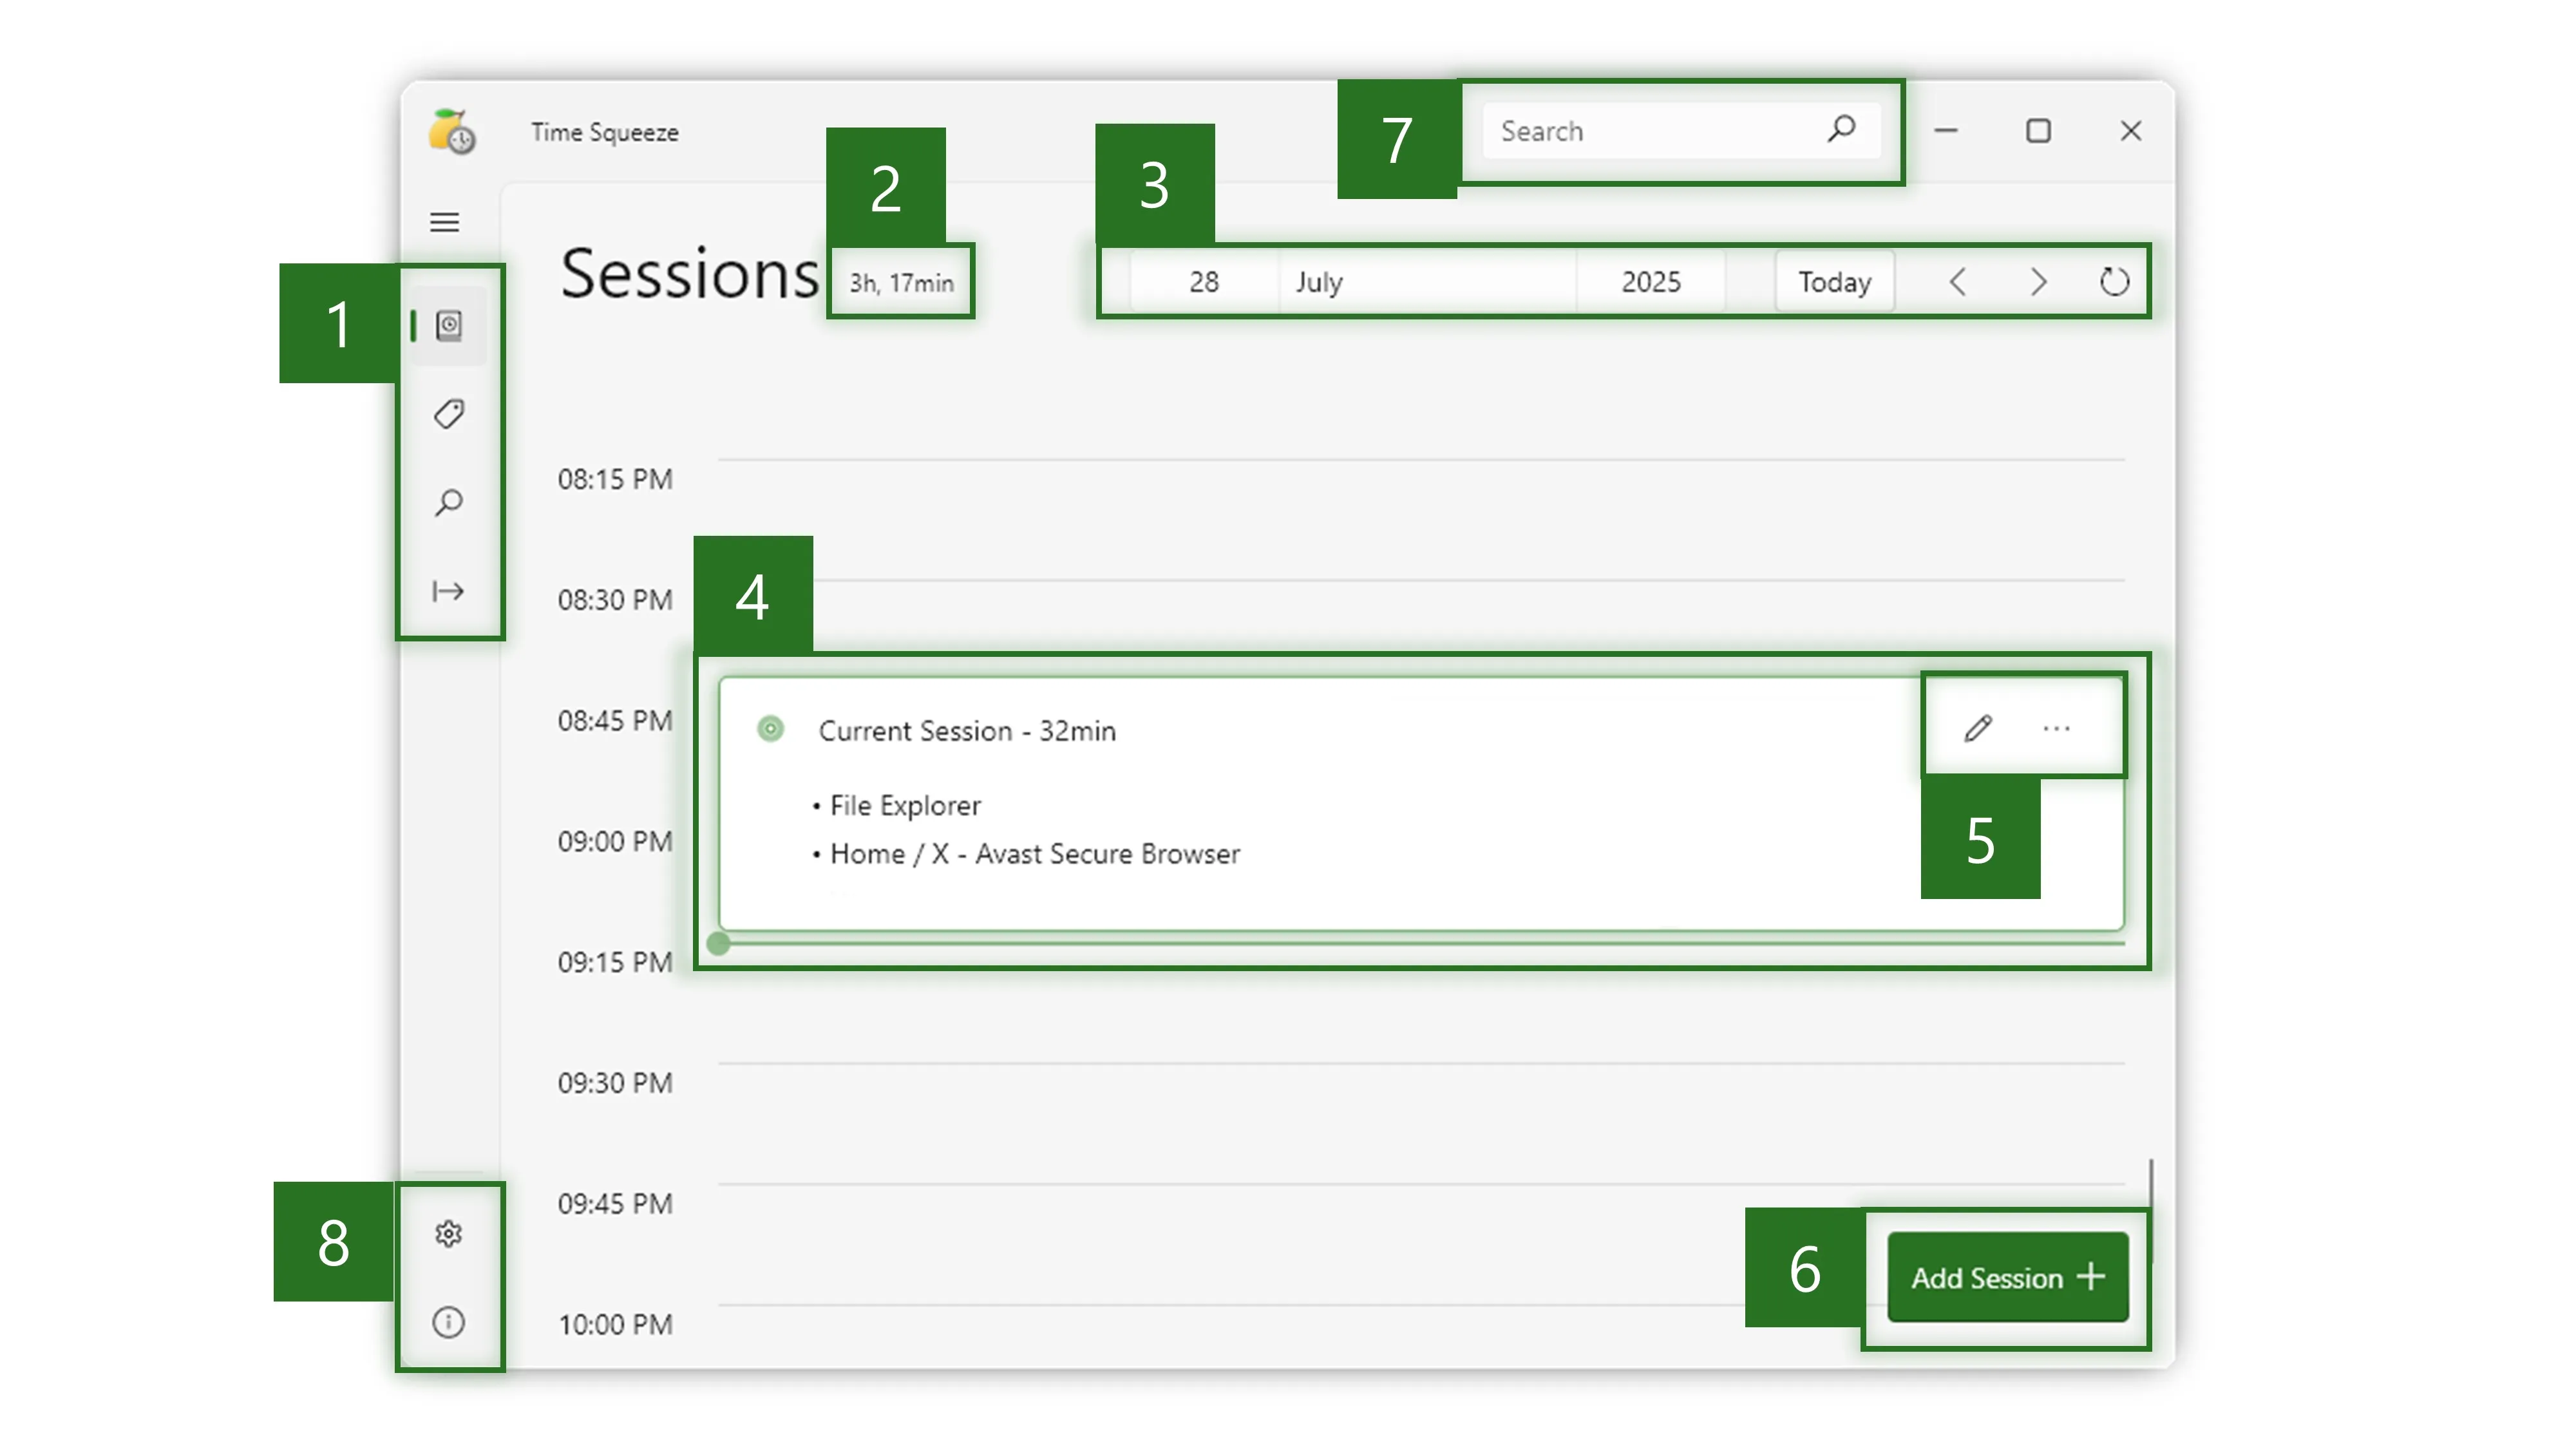
You will spend most of your time in the Sessions view. This view provides a daily agenda overview of your tracked sessions.
- View Selector
- Switch between Sessions, Tags, Search, and Export views. Currently, the Sessions view is selected.
- Total Time
- Displays the total time tracked for the selected date.
- Date Selector
- Select a specific date to view sessions for that day. You can select a specific date, navigate to the previous or next day, jump to today, or refresh the tracking data.
- Example Session
- Sessions are represented as entries on the agenda. Each session indicates its duration and provides a brief overview of its activities. If a session is the “current session”, it is surrounded by a glowing border.
- Session details
- Click a session to view its details and activity breakdown. Use the ✎ pencil icon to edit session details (add tags, notes, etc.).
- Manually Add a Session
- Click Add Session + to manually add a session. This is useful for adding time spent on tasks that were not automatically tracked (eg. meetings, phone calls, or other time spent away from your PC).
- Search Bar
- Use the search bar to quickly find specific activities. This is accessible from any view.
- Settings and Help
- Access settings, account details, help, and support options. This is accessible from any view.
Tags View - Clients and Projects
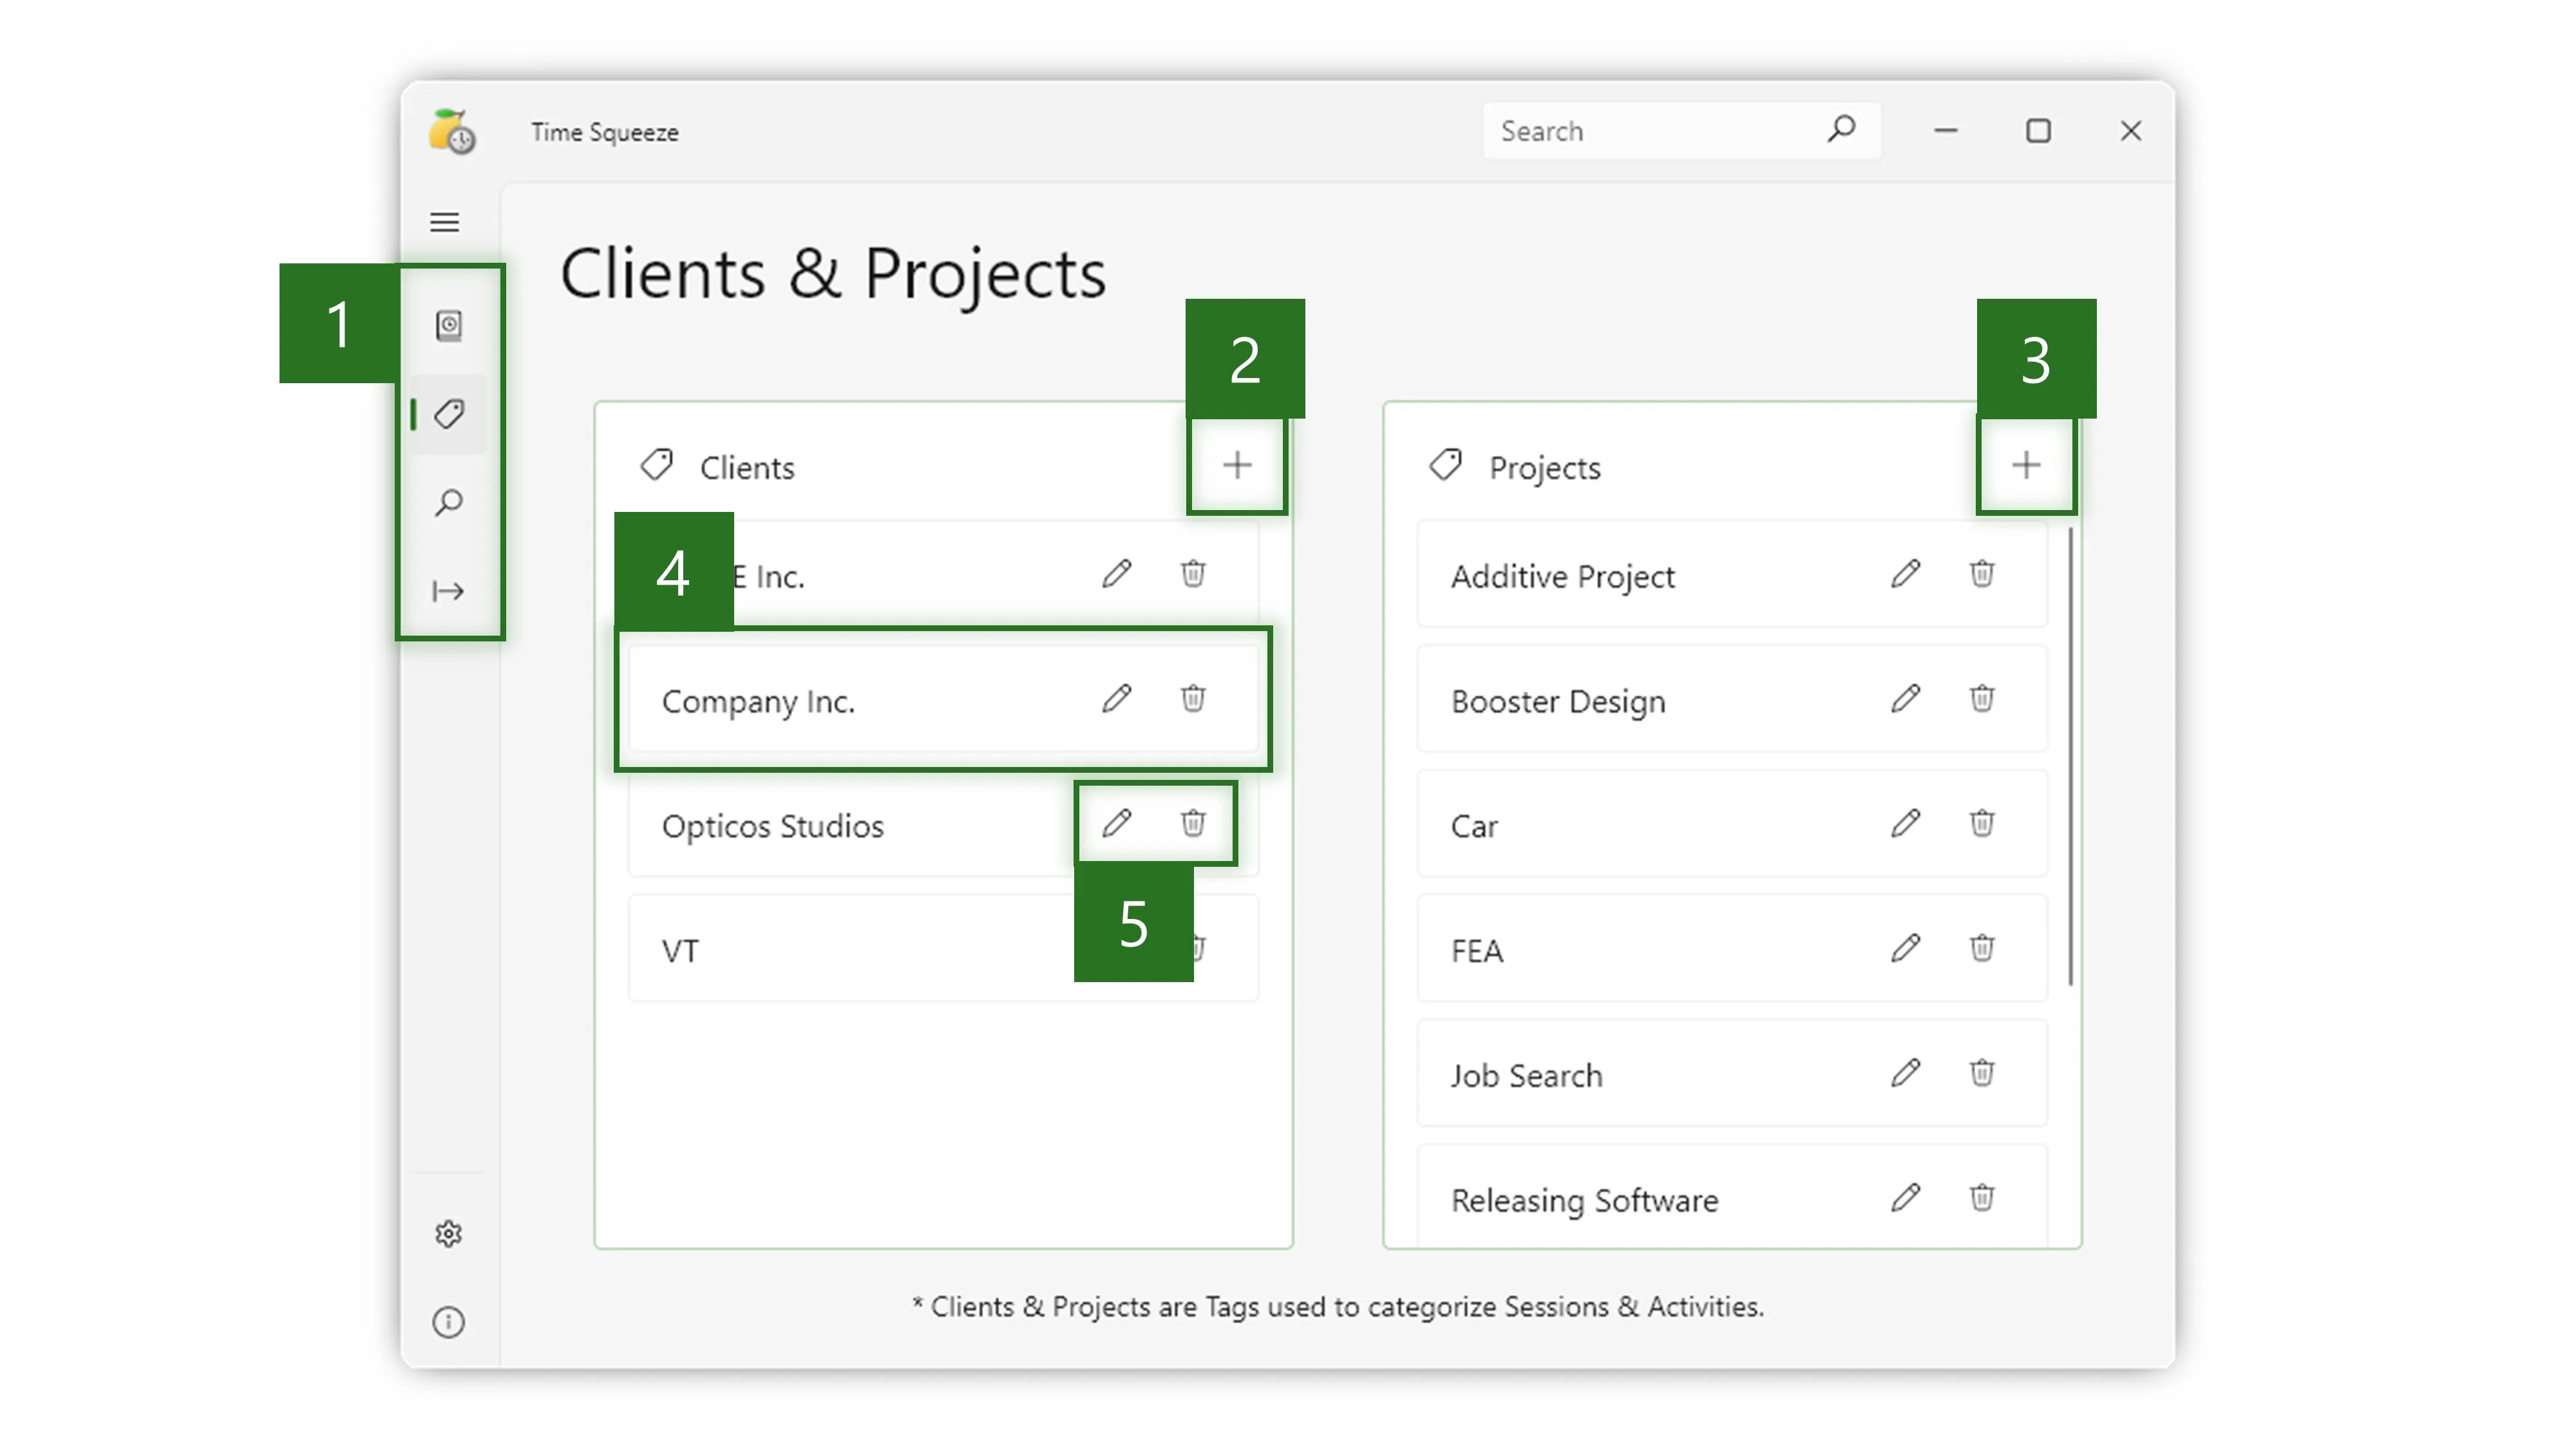
The Tags view allows you to manage your client and project tags. You can create, edit, and delete tags. Tags can be assigned to sessions and activities to categorize your work.
- View Selector
- Switch between Sessions, Tags, Search, and Export views. Currently, the Tags view is selected.
- Add a Client
- Click + to create a new client tag. This allows you to categorize your work by client.
- Add a Project
- Click + to create a new project tag. This allows you to categorize your work by project.
- Example Client
- Each client/project is represented as an entry in the list.
- Tag Management Buttons
- Click the ✎ pencil icon to edit a tag or the 🗑️ trash can icon to delete it.
Search View
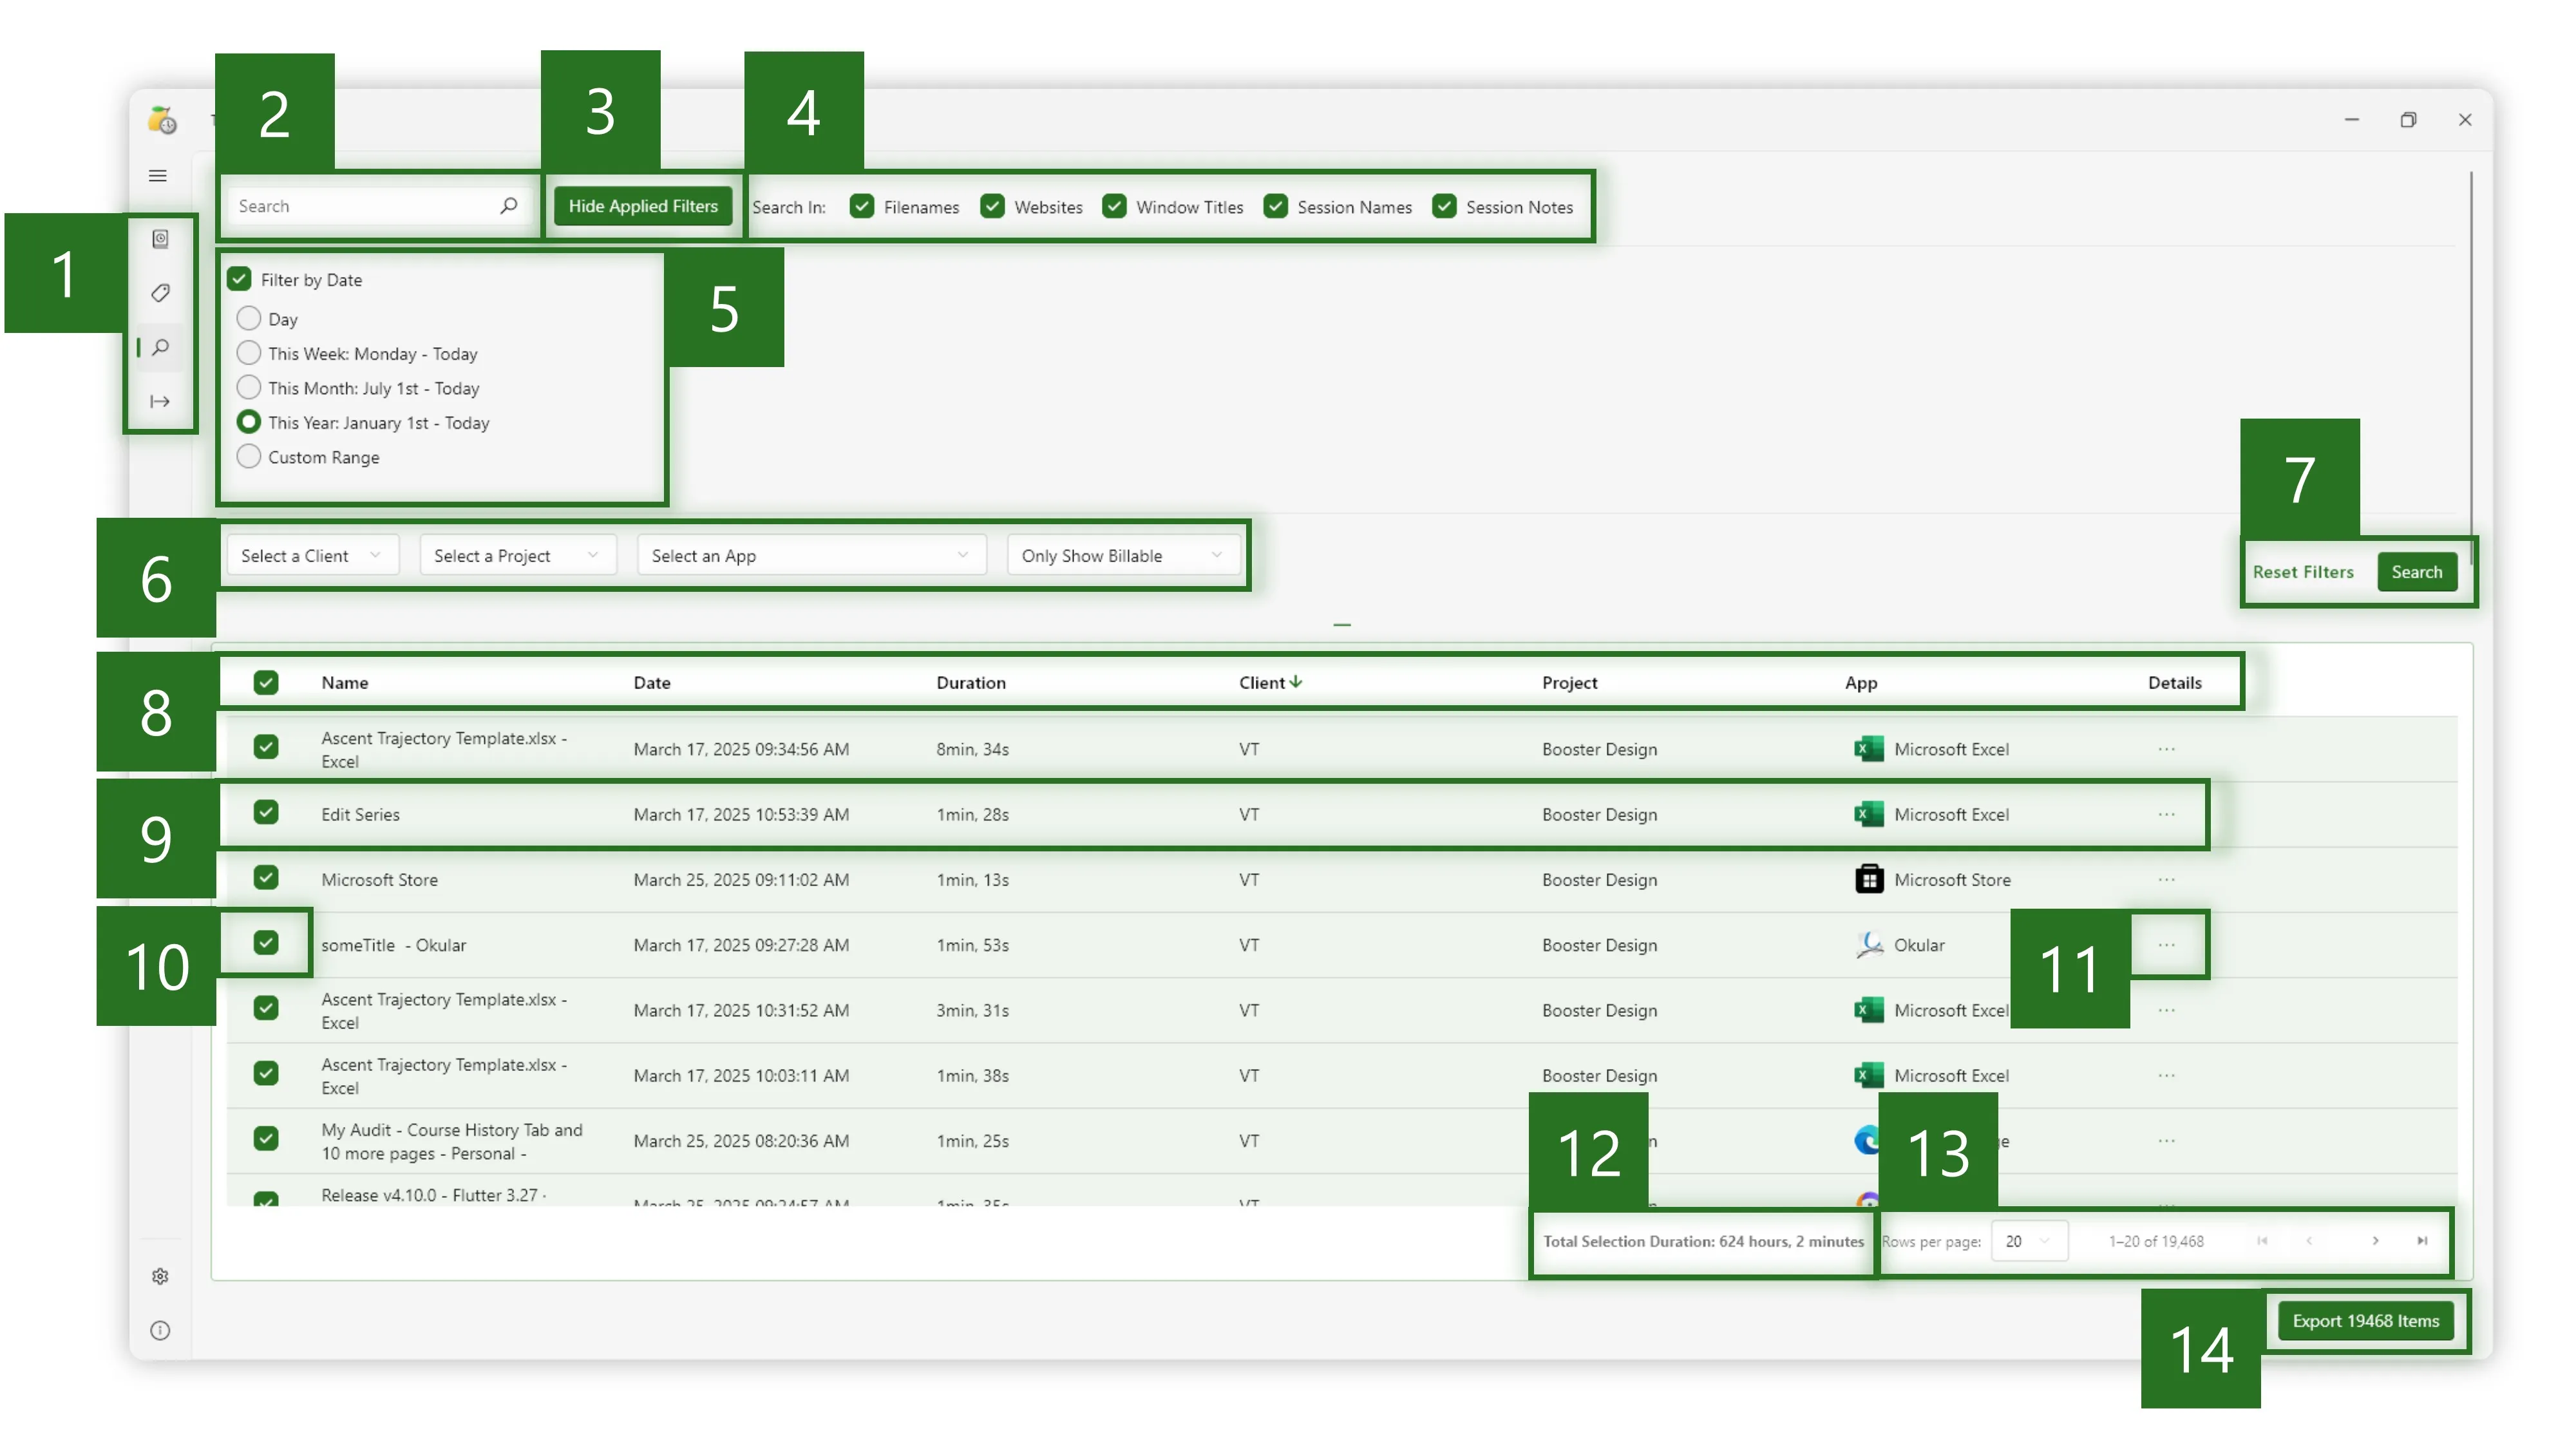
The Search view allows you to filter and search through your tracked data. You can search using dates, tags, and keywords to find specific activities. You can also export search results.
- View Selector
- Switch between Sessions, Tags, Search, and Export views. Currently, the Search view is selected.
- Search Bar
- Use the search bar to filter activities by keyword.
- Show / Hide Filters
- Click to expand or collapse the filter options section. Filters are still applied when hidden.
- Keyword Search Options
- Use these options to control where Time Squeeze searches for your keywords. You can search in filenames, websites, window titles, session names, and session notes.
- Date Range
- Use the Filter by Date options to restrict search results to a specific date or range of dates. Alternatively, you can quickly select the last calendar week, month, or year.
- Tag, App, and Billable Filters
- Use these filters to restrict search results to a specific client or project. You can also restrict results to a specific app. By default, items marked as Not Billable are hidden. Override this behavior clicking the Only Show Billable dropdown and choosing Select Billable Status (Show Everything) or Only Show Non-Billable.
- Reset Filters and Search
- Click Reset Filters to clear any applied filters. Click Search to apply the current filters and search terms.
- Search Result Column Headers
- Search results are displayed in a table format. You can sort by Name, Date, Duration, Client, Project, or App by clicking the applicable column header. Click the header again to reverse the sort order.
- Example Search Result
- Each search result is an activity represented by an entry in the table. Each entry shows the activity name, date, duration, client, project, and app used.
- Activity Selection Box
- Click anywhere on an activity to select or deselect it. Items with a check mark are selected for export.
- Activity Details
- Click the ⋯ three dots to view more activity details.
- Total Selection Duration
- Displays the total duration of all selected activities. This is useful for quickly calculating billable hours.
- Search Result View Controls
- Select how many search results to display per page. You can also navigate between pages.
- Export Selected Activities
- Click Export (#) Items to export the selected activities. This will open the Export view with the selected items pre-populated.
Export View
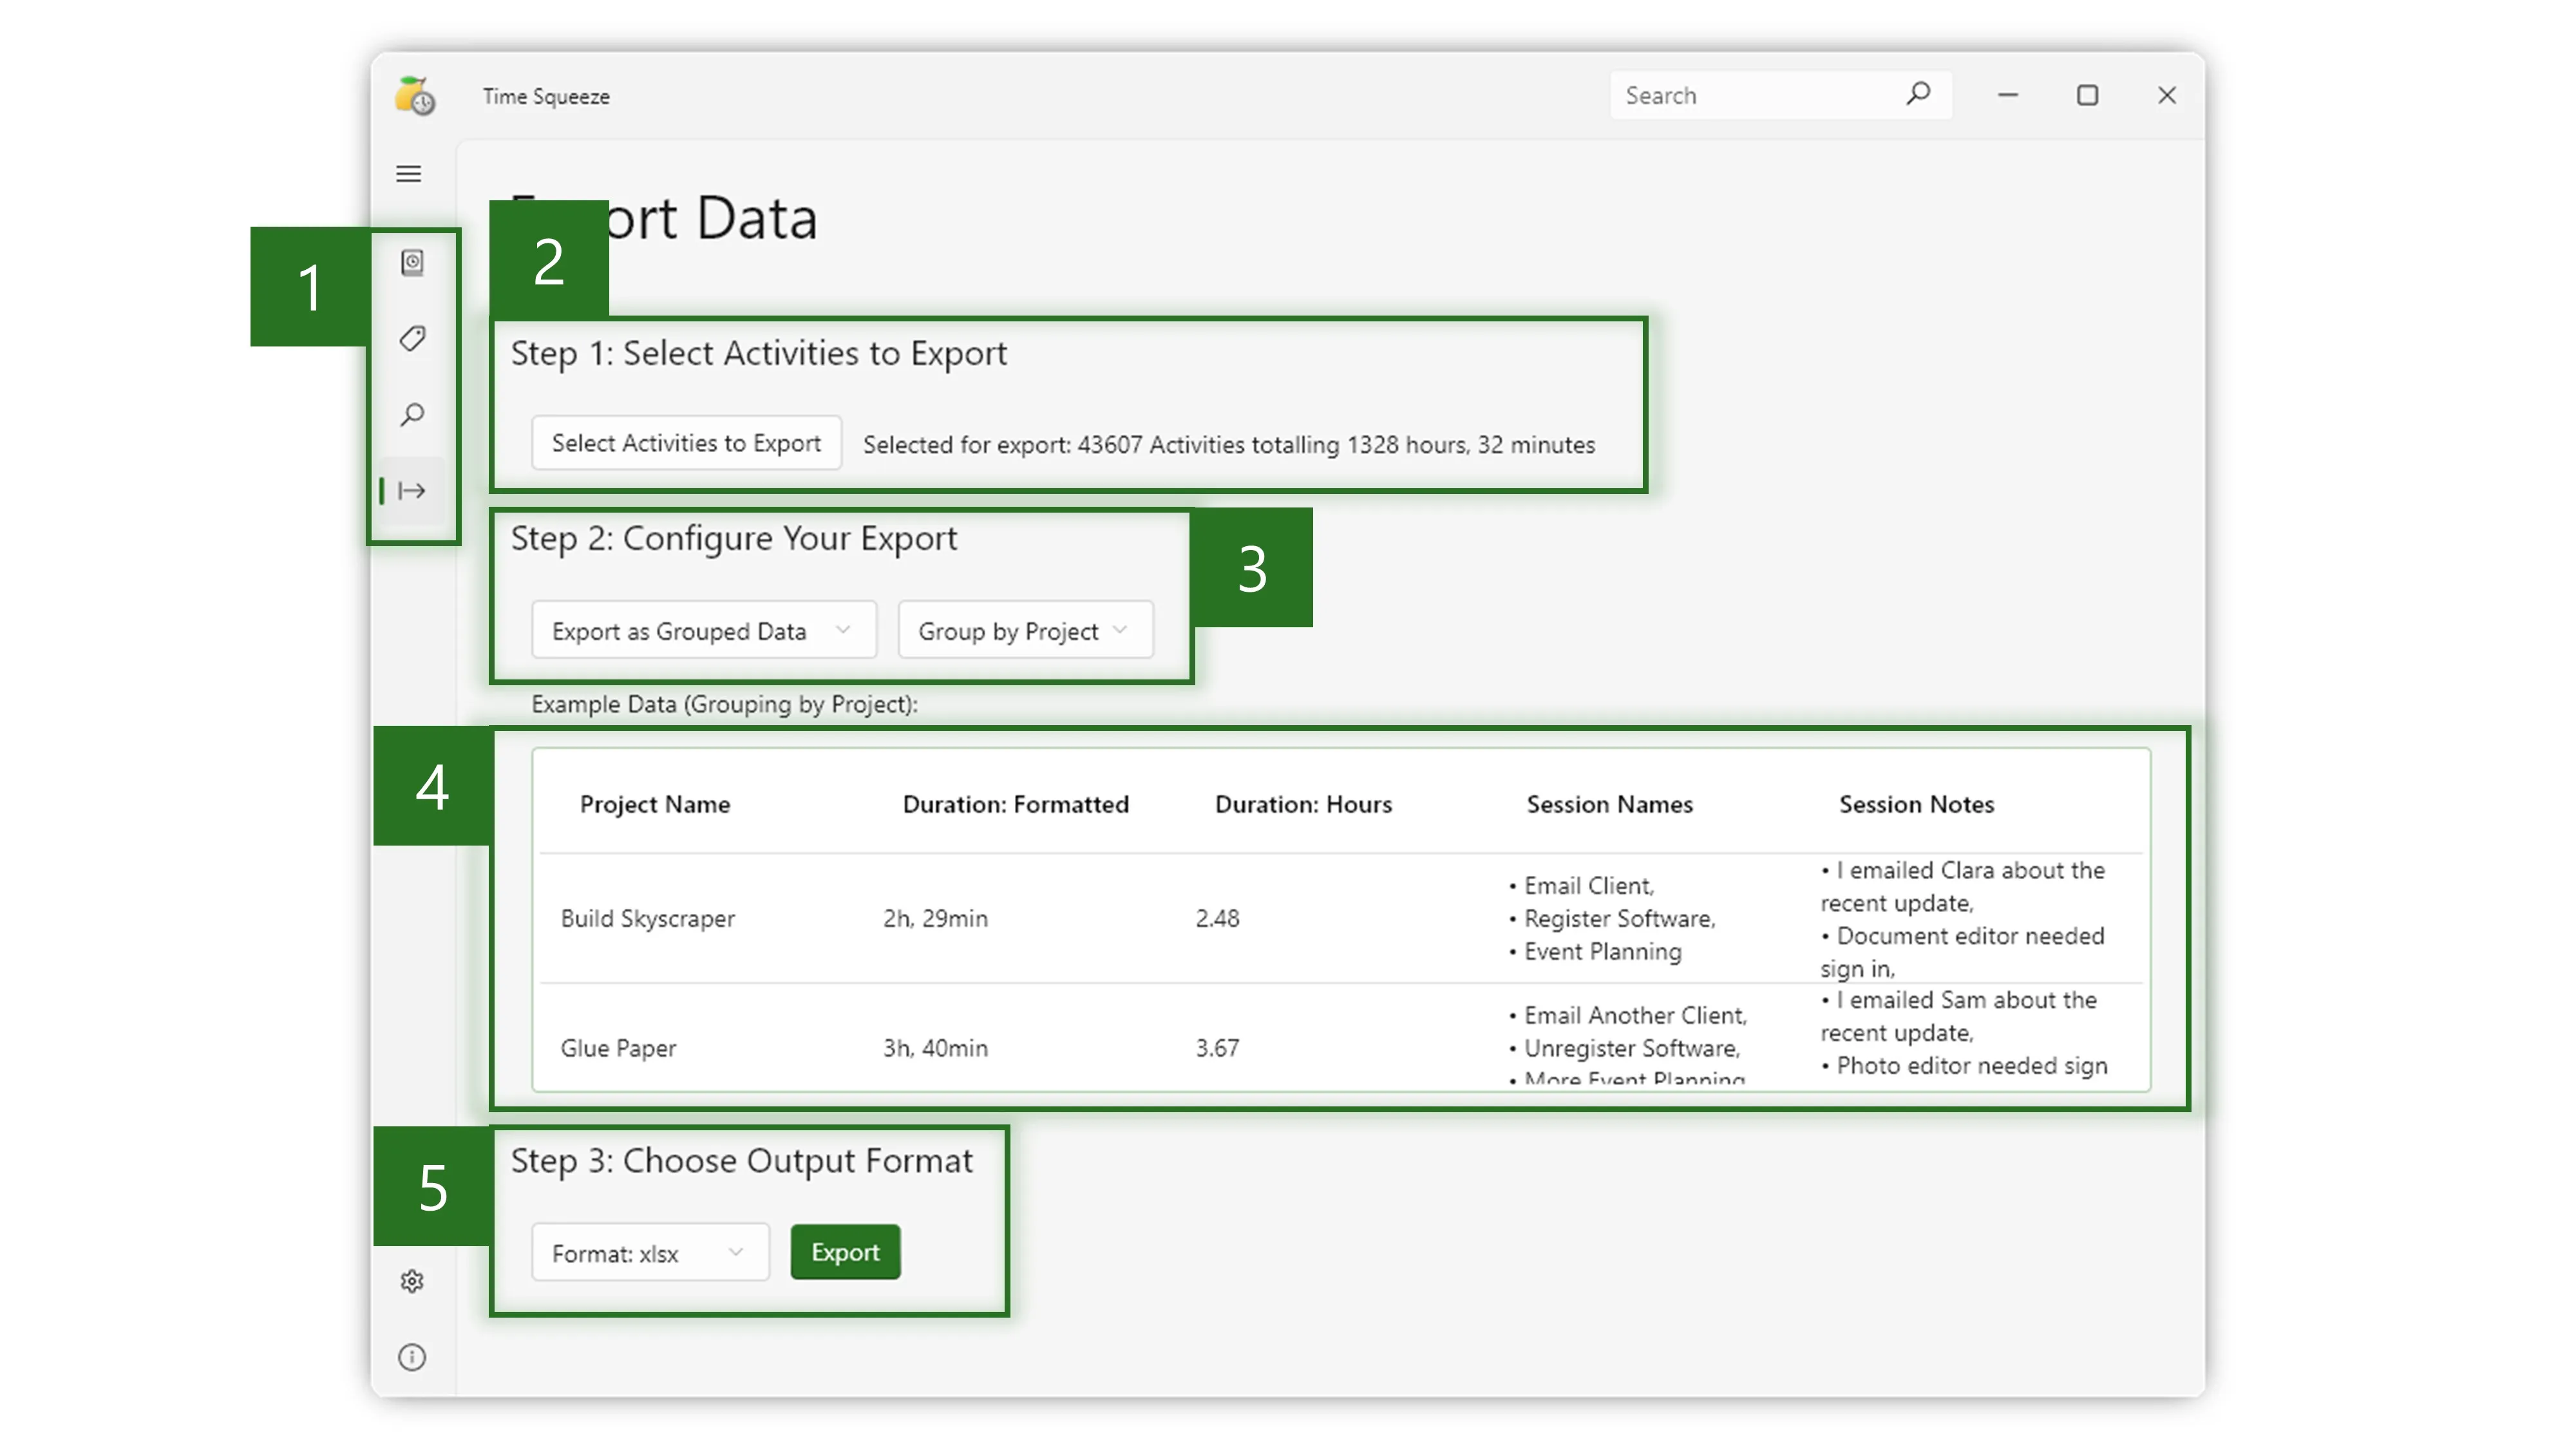
The Export view allows you to export your tracked data in various formats. You can either consolidate data (by Client, Project, Day, or App) or export everything as a simple list of activities. Time Squeeze supports exporting to Excel (.xlsx), CSV (.csv), and JSON (.json) files.
- View Selector
- Switch between Sessions, Tags, Search, and Export views. Currently, the Export view is selected.
- Select Activities to Export
- If you arrived here from the Search view, the selected activities will be pre-populated. Otherwise, click Select Activities to Export to choose activities using the Search view. Time Squeeze will display the quantity and combined duration of any activities selected for export. Step 2 will become visible once activities are selected.
- Configure Your Export
- Choose how you want to consolidate your data. You can group by Client, Project, Day, or App. You can also choose to export as a list of activities. Once you select an option, step 3 will become visible.
- Example Data
- Example data demonstrating your selected export configuration will be displayed.
- Choose Output Format
- Select your desired export format. Time Squeeze supports Excel (.xlsx), CSV (.csv), and JSON (.json) file types. Click Export to save the file to any desired location on your computer.
Configuring Time Squeeze
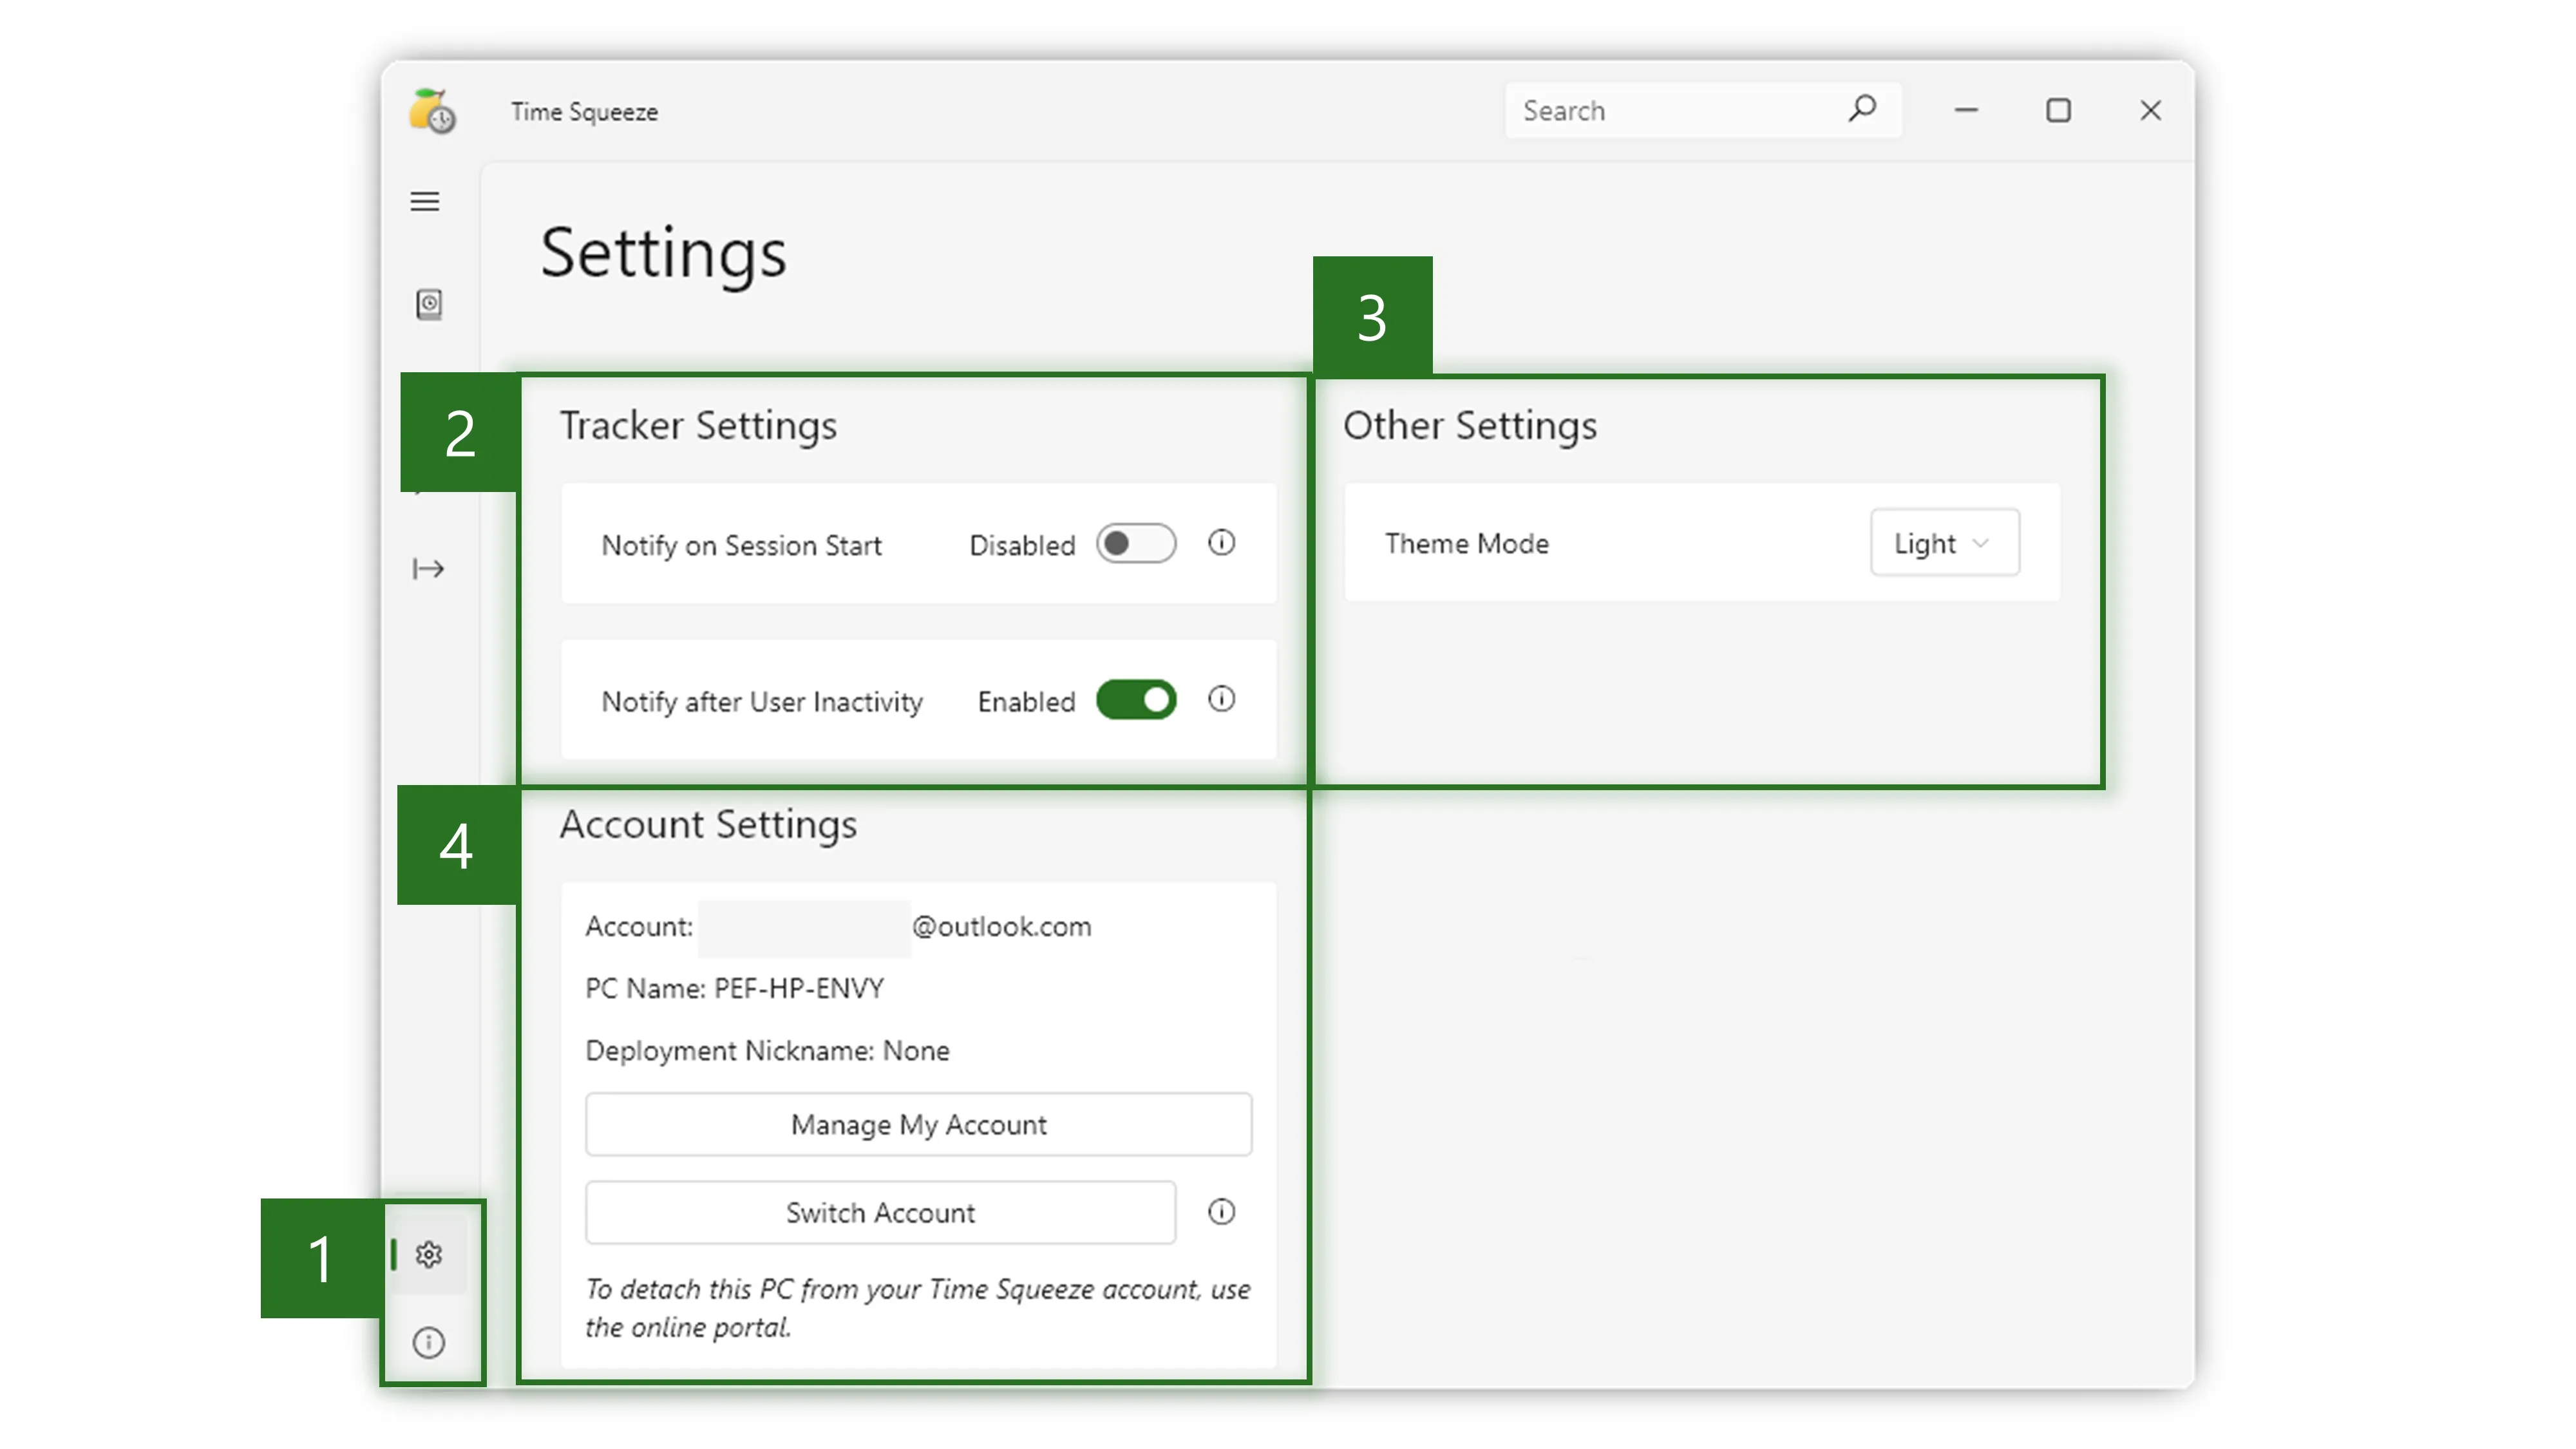
Time Squeeze provides useful options to tailor it to your needs. You can access the settings view by clicking the ⚙️ gear icon in the bottom left corner.
- Settings and Help View Selector
- Below the main view selector, you can select the Settings and Help & About views. Currently, the Settings view is selected.
- Tracker Settings
- Here you can configure Time Squeeze’s notification behavior. When Notify on Session Start is enabled, Time Squeeze will prompt you for session details when you begin working on your PC. This option is disabled by default. The Notify after User Inactivity option allows you track your time spent away from your PC. When you return to your PC, Time Squeeze will ask whether you want to save this time away as a new session. This behavior is enabled by default.
- Other Settings
- Time Squeeze supports Light, Dark, Auto theme modes. Auto mode will automatically switch between light and dark themes based on your system settings.
- Account Settings
- Here you can view your account details including email address, PC name, and deployment nickname. You can switch accounts or open the Time Squeeze online portal.